
Why Wire Gauge Is the Most Overlooked Part of Any 12V Build
Most overlanders spend hours researching the perfect dual battery setup, the right DC-DC charger, the best fridge — and then grab whatever wire is cheap and available at the hardware store. That’s a mistake that can melt insulation, blow fuses, start fires, or simply leave your fridge running warm because it’s starving for current. Wire gauge is not a detail. It’s the foundation of a safe, reliable 12V system.
This guide gives you a practical, no-fluff framework for sizing wire correctly — whether you’re running a simple fridge circuit or wiring an entire overlanding electrical system from scratch.
How AWG Works (And Why the Numbers Run Backwards)
AWG stands for American Wire Gauge — the standard used for electrical wire in North America. The counterintuitive part: lower AWG numbers mean thicker wire. A 2 AWG cable is much thicker than a 10 AWG cable. Think of it like drill bits — a larger number means a smaller hole.
Here’s a quick mental model for overlanding use:
- 0 AWG / 2 AWG — Main battery cables, winch runs, high-current trunk lines
- 4 AWG — DC-DC charger input/output, inverter connections under 1000W
- 6 AWG — High-draw accessories: air compressors, large inverters
- 8 AWG — Moderate loads: dual battery inter-connects, medium inverters
- 10 AWG — Fridge circuits, lighting runs, most 20–30A accessories
- 12 AWG — USB hubs, small 12V accessories, lighting under 20A
- 14–16 AWG — Low-draw sensors, control wiring, small LED circuits
The Two Variables That Determine Wire Size
Every wire sizing decision comes down to two things:
1. Amperage (Current Draw)
How many amps will the circuit carry? This is the load — your fridge, your compressor, your lighting. Check the spec sheet or measure with a clamp meter. Always use the peak draw, not the average. A 12V compressor fridge might average 3–4A but spike to 8–10A at startup.
2. Run Length (Total Circuit Distance)
Wire has resistance. The longer the run, the more voltage drop you get — and voltage drop means less power reaching your device and more heat generated in the wire. Always calculate total circuit length — that’s positive run plus negative return. A fridge mounted 3 metres from the battery has a 6-metre circuit.
The acceptable voltage drop for most 12V systems is 3% or less. For sensitive electronics (fridge compressors, inverters), aim for under 2%.
12V Wire Sizing Chart: AWG by Amps and Run Length
Use this table to find the minimum wire gauge for your circuit. Find your amperage in the left column, then move right to your total run length (positive + negative combined). The number in the cell is the minimum AWG you should use — go one size thicker if in doubt.
| Amps | Up to 1.5m (5ft) | Up to 3m (10ft) | Up to 5m (16ft) | Up to 7.5m (25ft) | Up to 10m (33ft) |
|---|---|---|---|---|---|
| 10A | 14 AWG | 12 AWG | 12 AWG | 10 AWG | 10 AWG |
| 15A | 12 AWG | 10 AWG | 10 AWG | 8 AWG | 8 AWG |
| 20A | 10 AWG | 10 AWG | 8 AWG | 8 AWG | 6 AWG |
| 30A | 10 AWG | 8 AWG | 6 AWG | 6 AWG | 4 AWG |
| 40A | 8 AWG | 6 AWG | 6 AWG | 4 AWG | 4 AWG |
| 60A | 6 AWG | 4 AWG | 4 AWG | 2 AWG | 2 AWG |
| 80A | 4 AWG | 4 AWG | 2 AWG | 2 AWG | 0 AWG |
| 100A+ | 2 AWG | 2 AWG | 0 AWG | 0 AWG | 0 AWG |
Note: These figures are based on 3% voltage drop maximum using copper wire. Increase one gauge size for CCA wire or runs through conduit/loom.
Common Overlanding Circuits: What Gauge Do You Actually Need?
Here’s how the chart applies to the most common overlanding electrical loads. These assume a typical install with runs of 3–5 metres each way.
Compressor Fridge (e.g. ARB, Dometic, BougeRV)
Average draw: 3–5A. Peak startup: 8–12A. Use 10 AWG minimum for runs up to 5 metres. Many fridges come with 10 AWG leads — don’t use the included cigarette lighter plug for a permanent install. Hard-wire directly to the aux battery with an inline fuse.
ARB Twin Air Compressor
Peak draw: 40–45A. This is a high-current device. Use 6 AWG minimum, ideally 4 AWG for longer runs. Fuse within 300mm of the battery with a 50A ANL or blade fuse. Do not run this through a standard fuse block — wire it directly.
LED Light Bar (e.g. 100W)
Draw: 8–10A at 12V for a 100W bar. Use 12 AWG for runs under 5 metres, 10 AWG for longer runs. Include an inline fuse or route through a relay — do not switch high current directly through a dash switch.
DC-DC Battery Charger (e.g. Renogy 40A)
A 40A DC-DC charger needs 8 AWG minimum on both input and output sides for short runs, 6 AWG for runs over 3 metres. The charger will get hot and throttle output if it’s being starved by undersized wire — you’ll charge slower and wear out the charger faster. Check out our complete dual battery wiring guide for the full installation walkthrough.
12V Inverter (1000W)
A 1000W inverter at 12V draws approximately 85–90A at full load. Use 4 AWG minimum, and mount the inverter as close to the battery as physically possible — every extra 30cm of cable costs you efficiency and adds heat. Fuse with a 100–120A ANL within 300mm of the battery.
Electric Winch (e.g. Warn 9.5ti)
Peak draw under load: 400–450A. This is why winch manufacturers include their own heavy cable — do not substitute. If you’re extending or replacing winch cables, use 0 AWG welding cable. Wire directly to the starter battery (not aux) with the included solenoid and fusing.
Copper vs CCA Wire: Do Not Cheap Out Here
CCA stands for Copper Clad Aluminium — wire with an aluminium core and a thin copper coating. It’s significantly cheaper than pure copper and it looks identical. The problem: aluminium has about 61% of the conductivity of copper. That means a 10 AWG CCA cable actually performs like a 12–13 AWG copper cable.
CCA wire is common in cheap audio wire, budget wiring kits, and some imported power cable. Signs you might have CCA: it feels lighter than expected, the cut end looks silver rather than uniformly orange, and it’s often suspiciously cheap.
Always use pure copper wire for your 12V system — particularly on high-current runs. Welding cable is an excellent choice for main battery cables: it’s pure copper, extremely flexible, and rated for the current you need.
Insulation Ratings: When Marine-Grade Wire Matters
Standard automotive wire (TXL or GXL rated) is fine for most interior and protected runs. Where you need to step up:
- Engine bay runs — Use GXL or SXL rated wire. Higher temperature tolerance (up to 125°C for SXL vs 105°C for standard).
- Exposed or outdoor runs — Marine-grade tinned copper wire resists corrosion from moisture, salt air, and mud. Worth the premium for any run that gets wet.
- Through-firewall penetrations — Always use a grommet. Never run wire bare through a metal hole — it will chafe through the insulation over time.
- High-heat areas — Avoid running wire close to the exhaust. If unavoidable, use high-temp loom or silicone insulation.
Step-by-Step: How to Calculate Wire Size for Your Build
Here’s the exact process to size any circuit in your overlanding electrical system:
- Identify the load. What device are you wiring? Find its peak current draw in amps from the spec sheet, or measure with a clamp meter at startup.
- Measure the total run length. Physically route where the cable will go — don’t guess. Measure from the battery positive terminal to the device, then add the return path to the battery negative. That’s your total circuit length.
- Look up the chart. Find your amperage row and run length column in the sizing chart above. Note the minimum AWG.
- Go one size up. If you’re at the border between two sizes, or if the wire will be in a loom, bundle, or conduit, upsize by one gauge. Wire in a bundle runs hotter.
- Check for CCA. If you’re buying wire, confirm it’s pure copper. Welding cable from a reputable supplier is a reliable choice.
- Size your fuse. The fuse protects the wire, not the device. Fuse at 125% of the expected continuous load, placed as close to the power source as possible — within 300mm of the battery for high-current runs.
Gear You’ll Need: Wire Sizing Shopping List
The right tools make the difference between a clean, reliable install and one that fails on a trail. These are the items worth having before you start any wiring project.
| Item | Recommended Pick | Why You Need It | Link |
|---|---|---|---|
| Pure Copper Welding Cable (2 AWG) | WindyNation 2 AWG Welding Cable | Flexible, pure copper, ideal for main battery runs and DC-DC charger cables | Check Price → |
| Pure Copper Welding Cable (4 AWG) | WindyNation 4 AWG Welding Cable | Great for DC-DC charger, inverter under 1500W, compressor circuits | Check Price → |
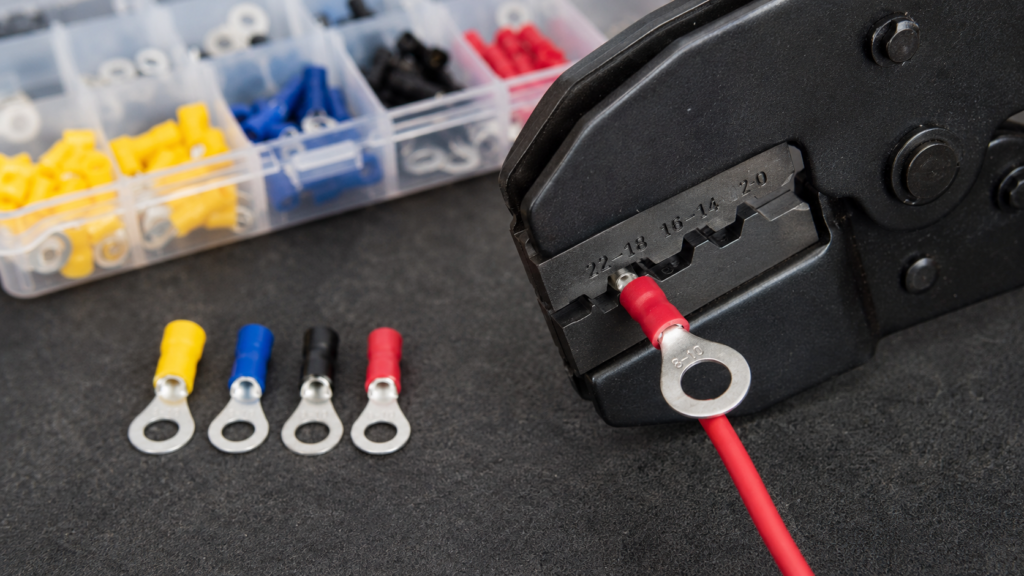
| Ratchet Wire Crimper | Wirefy Ratcheting Crimping Tool | Proper ratchet crimper gives consistent, gas-tight crimps — no loose terminals | Check Price → |
| Marine Heat Shrink Ring Terminals | Wirefy Marine Grade Ring Terminals | Adhesive-lined heat shrink seals out moisture — use these on any exposed connection | Check Price → |
| Clamp Meter | Klein Tools CL800 Clamp Meter | Measure actual current draw on any circuit — the only way to know for sure | Check Price → |
| Split Loom Tubing Assortment | Alex Tech Split Loom Kit | Protect wire runs from abrasion, heat, and UV — essential for any exposed run | Check Price → |
Affiliate disclosure: Links above are Amazon affiliate links. If you buy through them, we earn a small commission at no extra cost to you. We only recommend gear we’d actually run in our own rigs.
Final Thoughts
Wire sizing is one of those things that seems complicated but follows a simple logic once you understand the two variables — amps and distance. Use pure copper, use the chart, and always go one size up when you’re unsure. A slightly oversized wire costs almost nothing extra and gives you headroom for future loads. Undersized wire can cost you a vehicle.
If you haven’t already wired your dual battery system, read our complete dual battery setup guide — it covers DC-DC charger selection, battery types, fuse placement, and a step-by-step install walkthrough that puts all of this wire sizing knowledge to use.